* Jump to Japanese pages. Icon of Japanese Flag

WR-AOTSVer. 2.07 Manual
General information

This page contains the [1] System requirements, [2] Application user interface and [3] Quick start of WR-AOTSVer. 2.07.

System requirements

WR-AOTSVer. 2.07 requires PC, Stereophonic headphones or earphones, and pointing device such as mouse. It can also connect Nintendo® Wii® Remote Plus Controller™ and GPS.

  1. PC

    Microsoft® Windows® 7 / 8 (32 / 64 bit), Intel® Core™ 2 Duo and later are recommended. Windows® XP / Vista also can be used though sound quality is not good. Windows® RT is not supported yet.

    In order to avoid incorrect action, any peripheral devices using COM Port (e.g. RS232C) shall be removed in advance.

  2. Stereophonic headphones or earphones

    Not specified, but it must be able to connect to PC. You can buy it for dozens Euros/Dollars.

    If the instructor listens to the sounds with the trainee, two sets of headphones can be used through the forked adapter. You can buy it for several Euros/Dollars.

    * The closed type headphones are recommended for trainings of the obstacle perception. On the other hand, if you use the closed type headphone, you must note that the trainee cannot hear the verbal instruction of the instructor.

  3. Pointing device such as mouse.

    Left and right buttons are required.

  4. Nintendo® Wii® Remote Plus Controller™ (please prepare if possible)

    If possible, please prepare the latest version (the 3rd generation). You can buy it for about 40 Euros/Dollars.

    Sometimes built-in bluetooth of PC cannot connect Wii® Remote Plus Controller™. In this case, you can use external Bluetooth adapter through USB. The following product is recommended. You can buy it for about 12 Euros/Dollars.

  5. GPS (not required now)

    If possible, please prepare USB-connectable NMEA-format GPS. The following products are recommended. You can buy it for about 40-80 Euros/Dollars.

End of System requirements

Application user interface

This is the explanation of WR-AOTSVer. 2.07 application software window.

Monitor, icons, buttons, and checkboxes in the window are operated by the left button of pointing device such as mouse.

* Please see Quick start to start application.

This figure shows window of WR-AOTS(TM) 2.07. Each parts in the window are numbered from 1 to 27. Explanations of each parts follow this figure.
  1. Name of the XML-formatted file that contains the training field data.

  2. Name of training field.

  3. Monitor to display the training field. You can scroll it by dragging inside.

  4. Indicator to display action status of training field (Run, Stop or Pause).

  5. Indicator to show number of available GPS satellites, and also show GPS positioning is available/unavailable in red/black.

  6. Indicator to show inertial navigation by Wii® Remote Plus Controller™ acceleration sensor is available/unavailable in red/black.

  7. +, - and . stand for zoom in, zoom out and standard size, respectively

  8. Icon to switch on/off displaying names of the elements in the training field.

  9. Icon to switch on/off displaying the sound lines (from sound sources to trainee) in the training field.

  10. Icon to open window to show credit information.

  11. Button to open window to load training field file. This is used to load the training field data file saved in XML format.

  12. Button to open window to save training field file. This is used to save the edited or newly made training field data in XML format file.

  13. Button to open window to edit training field. This is used to edit or newly make training field data.

  14. Button to open window to show the XML source code of training field.

  15. Button to record the initial measured values of GPS and the built-in sensors of Wii® Remote Plus Controller™, and calibrate them. The calibration must be done in advance to run training field.

  16. Button to run training field.

  17. Button to stop training field. If you push Run button after this, the training field starts from the initial situation.

  18. Button to pause training field. If you push Run button after this, the training field starts from the situation just after paused.

  19. Button to quit the application.

  20. Checkbox to switch on/off inertial navigation when the GPS positioning is unavailable. Keeping switch on is recommended.

  21. Checkbox to switch on/off anti-drift processing to cancel errors of GPS and Wii® Remote Plus Controller™ acceleration sensor. Keeping switch on is recommended.

  22. Checkbox to switch on/off the stable operation mode that uses only stable outputs of gyro and Wii® Remote Plus Controller™. Keeping switch on is recommended now.

  23. Checkbox to switch on/off GPS. If GPS is not connected, this checkbox must be unchecked.

  24. Checkbox to switch on/off Wii® Remote Plus Controller™. If Wii® Remote Plus Controller™ is not connected, this checkbox must be unchecked.

  25. Checkbox to switch on/off ambient sounds coming from distant places.

  26. Button to open setting window of ambient sounds coming from distant places. In the setting window, kind of noise, direction and volume can be set.

  27. List to switch the audio output. MME, DirectX® or ASIO® can be selected. Please select MME for Windows® 7 /8, and DirectX® or ASIO® for Windows® XP / Vista.

  28. Indicator to show status whether each button or checkbox is operatable or not, or operation is mandatory in advance to run, in green/off/red.

Application user interface

Quick start

First of all, let's start WR-AOTS™ Ver 2.07! In this time, you don't need to connect neither GPS nor Wii® Remote Plus Controller™. Please prepare just PC with WR-AOTS-207 folder, mouse and headphones.

  1. Start the application.

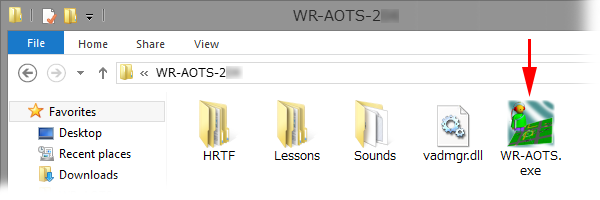
    Please make sure that you have the following five items in WR-AOTS-207 folder.

    • WR-AOTS.exe
    • vadmgr.dll
    • Sounds folder
    • Lessons folder
    • HRTF folder

    WR-AOTS.exe is the execution file of this application. Please double-click on this file and start the application.
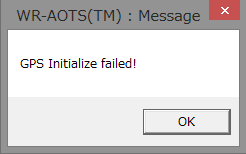
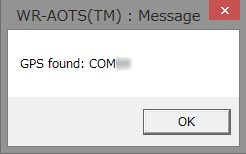
    * If the error occurs when the application is activated, please see Q&A of Manual.

    This figure shows the window of WR-AOTS-207 folder.
  2. Message window of GPS will open.

    When you start the application, you will find first that a message window of GPS that says GPS Initialize failed! if you didn't connect GPS, or GPS found: COM** (** is tow-digits number) if you connected GPS. Anyway, please push OK button.

    This figure shows pushing OK button on the message window saying : GPS Initialize failed! or This figure shows pushing OK button on the message window saying : GPS found : COM**.

    When you push OK button, the message window of GPS will close.

  3. Main window will open.

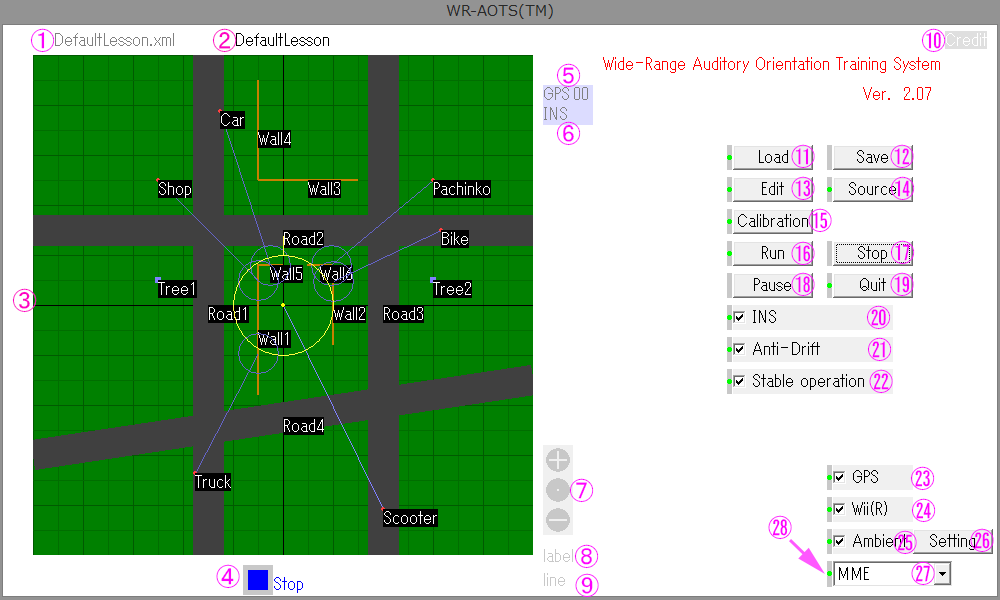
    Just after the message window of GPS closed, the Main window shown in Application user interface will open with blank and black training field monitor, training field file name NoFile.xml and training filed name -No Field.

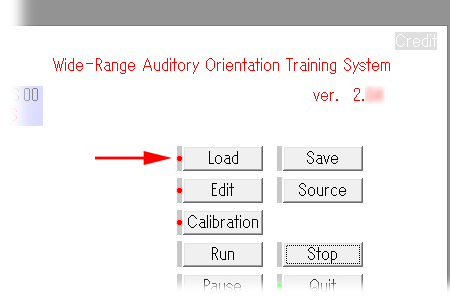
  4. Load training field data.

    Please push Load button to open window to load training field file.

    This figure shows pushing Load button.

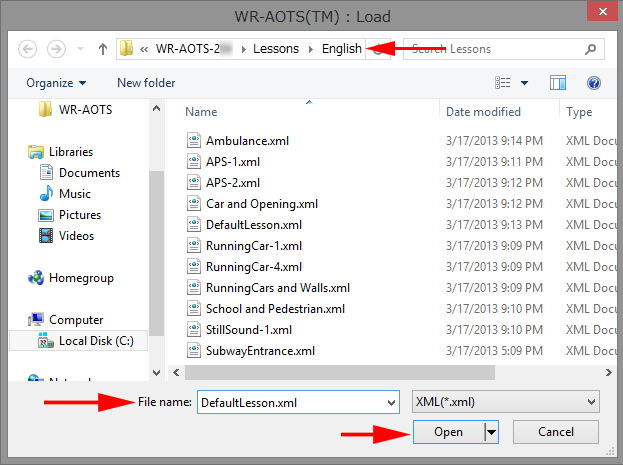
    When the window to load training field file opened, please select training field data file and load it from English folder in Lessons folder. DefaultLesson.xml will be selected by default, please push Open button to load it in this time.

    This figure shows that DefaultLesson.xml is selected in the window to load training field file, and is loaded.

    When the loading is complete, the training field will be displayed on the training field monitor.

  5. Calibrate sensors (you don't use them now)

    As a next step, GPS and the built-in sensors of Wii® Remote Plus Controller™ must be calibrated. But they are not used in this time, so that the following procedure is superficial.

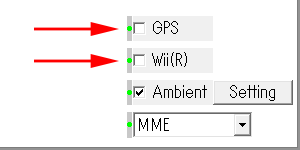
    Please uncheck GPS and Wii checkboxes.

    This figure shows that GPS and Wii checkboxes are unchecked.

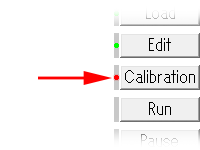
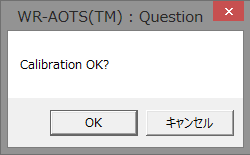
    When you push Calibration button, question window to ask Calibration OK? will open. Please push OK button.

    This figure shows pushing Calibration button. This figure shows pushing OK button on the question window.

    The question window will close. As a matter of fact, calibration is not done in this time.

  6. Run finally.

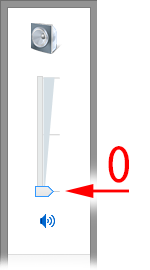
    Let's run finally. Please connect stereophonic headphones or earphones to audio output of PC. For trainee's safety, please set sound volume at 0 in advance.

    This figure shows that trainee is using headphones. This figure shows that volume is set 0 on Windows(R) 8.

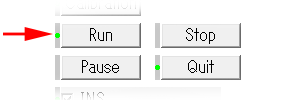
    Please push Run button.

    This figure shows pushing Run button
  7. Sounds come out.

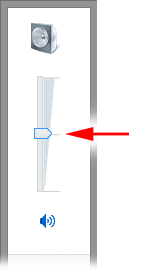
    When you push Run button, the Sounds in the training field displayed on the monitor will start to move and play sounds. Please adjust sound volume to listen comfortably.

    If it is the first time for the application to run since the Windows® operating system started, it may takes at longest two minutes to start sounds after Run button is pushed.

    This figure shows that trainee is using headphones. This figure shows that  volume is set 50 on Windows(R) 8.

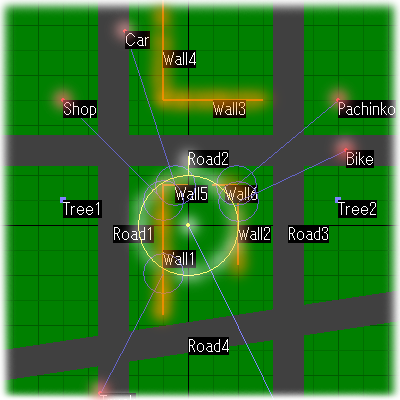
    The grid in the training field monitor are 5 m/div. Upper side is south, and left side is east. The crossing point of the south-north and east-west axes is the origin of the training field. The yellow dot surrounded by the yellow circle stands for the head position of the Trainee in the training field. The yellow short line coming out from the yellow circle stands for the head direction of the Trainee in the training field. The red dots stand for sources of the Sound. The orange thick lines stand for the Walls that reflect and insulate the sounds.

    This figure shows the training field displayed on the monitor. The yellow dot standing for the head position of the Trainee in the training field, the yellow circle and short line standing for the head direction of the Trainee in the training field, the red dots standing for the Sound and the orange thick lines standing for the Walls are highlighted.

    The blue lines stand for the sound lines (sound paths from the Sound to the Trainee). If the sound line is interrupted by the Wall, the blue circle will appear at the interruption point. This shows that the sound is insulated by the Wall. The gray fat lines stand for the Roads, and the purple dots stand for the Marks. The Roads and the Marks do not influence on the sound propagations.

    The sounds presented through the headphones are reproduced the sounds that may be heard by the Trainee in the training field in 3-D manner. When the Trainee moves or turns in the training field, the presented sound will also change. The Doppler effect that occurs on the moving sound sources, and the obstacle perception that occurs when the Trainee approach the Wall (in this case, the Wall color changes from orange to white) are also reproduced.

    In order to move the Trainee in the training environment, you can use mouse, Wii® Remote Plus Controller™, and GPS. The followings are the explanations of their roles. The explanations of method to use them are skipped here.

    • Mouse can move the Trainee in the training field displayed on the monitor directly. It is used when the instructor moves the trainees and presents the sounds to him/her.
    • Wii® Remote Plus Controller™ can move the Trainee in the training field as the same motion as the trainee's head motion measured by it fixed on the head (headphones). It is used when the trainee listens to the sounds with walking and orienting his/her head by him/herself.
    • GPS can also move the Trainee in the training field as the same motion as the trainee's motion measured by it carried by the trainee. It is mainly used when the trainee walks long distance. It must be used with mouse or Wii® Remote Plus Controller™ because it cannot measure the head orientation.
  8. Operate the monitor

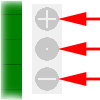
    The monitor can be zoomed in/out by using the Zoom icons. The monitor can be scrolled by dragging inside of it by mouse. When the . (dot) of Zoom icons is clicked, the monitor will be reset to the initial size and position.

    This figure shows clicking Zoom icons.
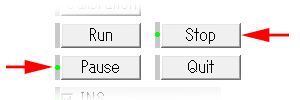
  9. Stop or pause the run.

    Please push Stop button to stop the run. Please push Pause button to pause the run.

    This figure shows pushing Stop or Pause buttons.

    If you push Run button after pushing Stop button, the training field will start from the initial situation. If you push Run button after pushing Pause button, the training field will start from the situation just after paused.

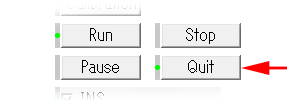
  10. Quit the application.

    Please push Quit button to quit application.

    この図は、終了ボタンを押す図です。
End of Quick start